
Off To The Cloud - Part 1
aws, terraform, cloud

This series of posts will be covering my journey to create a "traditional" web app using IAC, python and AWS. This can be thought of a port of a traditional enterprise app onto the cloud. The code can be found on my github in the offToTheCloud project, the real aws part begins at part 1.
App Architecture
A basic web REST API with a database - cookie cutter app most folk have written or worked on before. Adding a micro UI or integrating with a front end is as simple as updating the CORS settings; but we wont add this just yet.
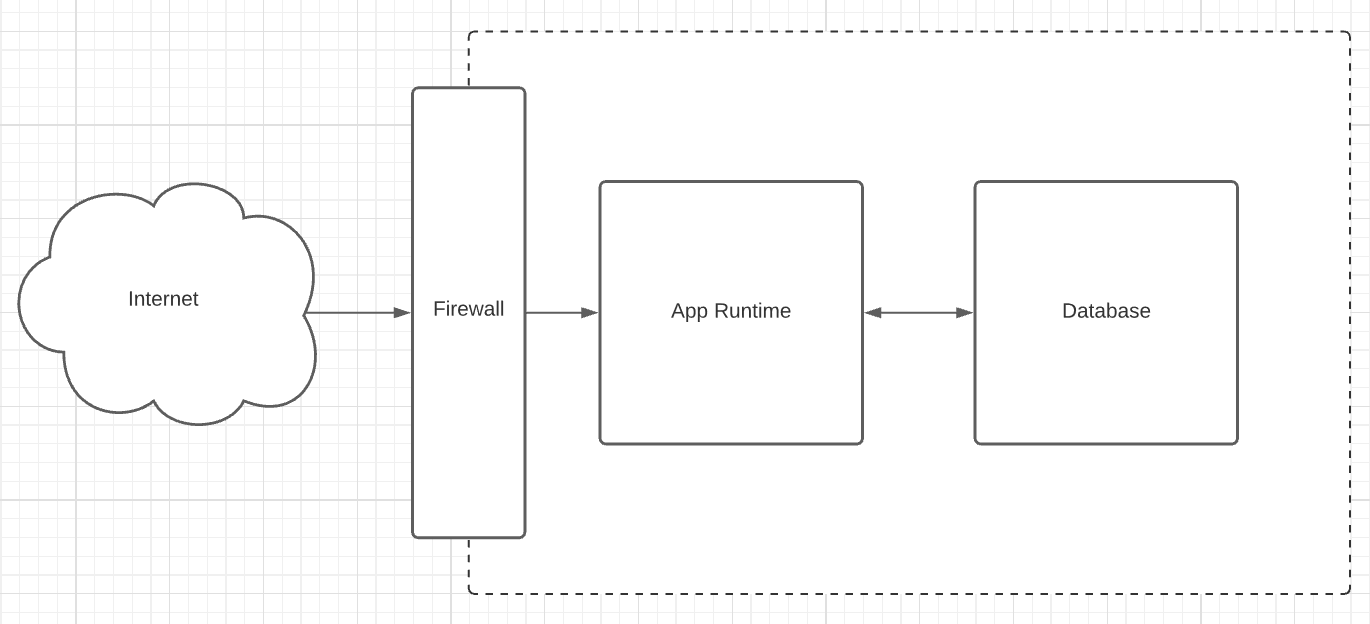
Pretty basic setup which has an arbitrary app runtime, most likely in a legacy system this is just a process running on a host.
Step 0 - Setting up Environment
Hopefully you've used git, python, docker and maybe terraform before, as that's the stack for this post. I've set up the example repo over on GitHub, go through the readme to get more background on how to set up the app locally.
As with the rest of the steps, the code can be started from the IAC folders. In this first case we will use the local IAC folder. This uses docker compose locally and will set up the app to point to a local docker database with no data in to start. There are also instructions to set up without docker, but that requires a live postgres server or using a local/memory sqlite db.
1docker compose --file iac\local\docker-compose.yml up -d
These containers can also be killed with.
1docker compose --file iac\local\docker-compose.yml down
Now you can see the API on
Setting up cloud env & Terraform intro
Moving on to the rest of the post we will be using
Terraform (get started link)
. Install the code and set up a remote back end
to not lose the state (you'll need to update this in the IAC code).The code will live in the iac/* files and each step
can be created in the relevant steps folder with terraform commands.
To get up and running with terraform in AWS, make sure you have your aws credentials set up; follow the AWS CLI install and have that setup with you root or IAM admin creds.
Part 1 - Migrating to cloud
Moving over to cloud will take a very simple, lift and shift, approach; an introduction to the AWS basics of cloud. We will focus on a small set of services:
- VPC
- Subnets
- Security Groups
- Availability Zones
- EC2
Before We Start
This tutorial will reduce the access to most instances from the world wide web, limiting access only to your own external facing IP address. We will also secure most access to via ssh using an ssh key. More info can be learned here but the basics are 1 - DONT SHARE YOUR PRIVATE KEY FILE!, its the id file for your computer and sharing it meand people can impersonate you. Thats about it, only share the id_rsa.pub part of the key.
To generate a new key, use the below command:
1ssh-keygen -t rsa -b 4096
1.1 - Building The Network
First step will be creating some networking resources. Initially a VPC, the isolated box to put our resources in. We will use the terraform vpc module to shortcut a bit of work for us. What this look like is:
1 2 3 4 5 6 7 8 9 10 11 12 13 14 15 16 17 18 19 20 21module "vpc" { source = "terraform-aws-modules/vpc/aws" version = "2.77.0" name = "step_1_vpc" cidr = "10.0.0.0/22" public_subnets = [ "10.0.0.0/24" ] private_subnets = [ "10.0.1.0/24", ] # only use one AZ, as its cheaper not to ship data to other subnets azs = [ "us-east-1a" ] enable_dns_support = true enable_dns_hostnames = true tags = merge(local.default_tags, { Name = "Step 1 VPC" }) }
From here we will need a few more items, namely some security groups to allow access between resources.
1 2 3 4 5 6 7 8 9 10 11 12 13 14 15 16 17 18 19 20 21 22 23 24 25 26 27 28 29 30 31 32 33 34 35 36 37 38 39 40 41 42 43resource "aws_security_group" "my_ssh_access" { vpc_id = module.vpc.vpc_id ingress { from_port = 22 protocol = "tcp" to_port = 22 cidr_blocks = [ local.my_ip_cidr ] } tags = merge(local.default_tags, { Name = "SSH Access" }) } resource "aws_security_group" "https_access" { vpc_id = module.vpc.vpc_id ingress { from_port = 443 protocol = "tcp" to_port = 443 cidr_blocks = [ "0.0.0.0/0" ] } tags = merge(local.default_tags, { Name = "HTTPS Access" }) } resource "aws_security_group" "postgres_comms" { vpc_id = module.vpc.vpc_id ingress { from_port = 5432 protocol = "tcp" to_port = 5433 cidr_blocks = module.vpc.private_subnets_cidr_blocks } tags = merge(local.default_tags, { Name = "postgres comms" }) }
Final part of the networking is the elastic IP we can associate to the public API to ensure the IP doesn't change when rebuilding the host. This is an Amazon owned IP that were leasing and can associate with any of the pieces of infra we want to.
1 2 3 4resource "aws_eip" "elastic_ip" { instance = aws_instance.app_server.id vpc = true }
1.2 - Setting Up Hosts
The real basic lift and shift will move the code onto EC2 hosts. From here we can ssh in and execute commands to start our processes. Firstly, a pair of hosts for app and database; one in public and one in private subnets.
1 2 3 4 5 6 7 8 9 10 11 12 13 14 15 16 17 18 19 20 21 22 23 24 25 26 27 28 29 30 31 32 33resource "aws_key_pair" "personal_rsa_key" { key_name = "my_rsa_key" public_key = file(pathexpand("~/.ssh/id_rsa.pub")) } resource "aws_instance" "app_server" { # AMI is the default for us-east-1, may differ for different regions ami = "ami-0ff8a91507f77f867" instance_type = "t2.nano" subnet_id = module.vpc.public_subnets[0] key_name = aws_key_pair.personal_rsa_key.id security_groups = [ aws_security_group.my_ssh_access.id, aws_security_group.https_access.id ] tags = merge(local.default_tags, { Name = "App Server" }) } resource "aws_instance" "db_server" { ami = "ami-0ff8a91507f77f867" instance_type = "t2.nano" subnet_id = module.vpc.private_subnets[0] key_name = aws_key_pair.personal_rsa_key.id security_groups = [ aws_security_group.my_ssh_access.id, aws_security_group.postgres_comms.id ] tags = merge(local.default_tags, { Name = "Database Server" }) }
Note how these both have aws_security_group.my_ssh_access security group attachment and
the aws_key_pair resource.
This is to allow us ssh access from our machine, this requires you to have completed
the before we start section.
To make this easy, we should add some outputs that provide some details about what we just created. so the below is a couple outputs that will be useful.
1 2 3 4 5 6 7 8 9 10 11output "app_server_ip_pub" { value = aws_instance.app_server.public_ip } output "app_server_ip_priv" { value = aws_instance.app_server.private_ip } output "db_server_ip_priv" { value = aws_instance.db_server.private_ip }
1.3 - Deployment
Now we have all our infra IaC set up, lets hit deploy. This is done with terraform init && terraform apply, follow the
steps through and enter yes, you should see something like the below:
1 2 3 4 5 6 7Apply complete! Resources: 2 added, 1 changed, 2 destroyed. Outputs: app_server_ip_priv = "10.0.0.xxx" app_server_ip_pub = "54.86.xxx.xxx" db_server_ip_priv = "10.0.1.xxx"
These are your results of the apply stage! Notice how there are 2 IPs with _priv and one with _pub. These mean you can
only access the public application server from the internet. If we wanted we can now connect to the public app server
with ssh 54.86.xxx.xxx and it will execute a private key authentication against the public key we provided in
the aws_key_pair resource. There are however better ways of accessing these servers - a VPN connection into our VPC.
The setup of this is outside the scope of this post, but once this is complete you will be able to access both hosts via
the vpn with private key auth.
Once your infra is all set up it just takes logging into the host and executing the right commands to run this code. The real next steps are cloud native, so we will skip the overly complicated cli commands to finish off step 1 and move onto step 2.